@Nick
I haven’t tried Image Smith yet, but I did some testing with Retrobatch image optimization. Does Image Smith require the use of Rosetta on Apple silicon Macs?
Retrobatch does convert to webP, although I am not convinced at all that this format has any benefits over JPG or PNG – both in image size and in image quality (I did some testing in the past with Retrobatch – maybe RB was at fault?).
While RB does a good job with JPG images, I found that PNG optimization leaves a lot to wish for as far as file size is concerned. As an example, just a few days ago, I have tried to compress two PNG images at the maximum possible compression setting in Retrobatch. Originals were 449 kB and 927 kB. They were compressed to 369 kB and 734 kB, respectively. That seems not very effective at maximum compression level.
No need for Rosetta. webp is the ‘latest and greatest’ fashion trend and images are smaller, but detail is missing at comparable settings to jpg ie 50% in both. PNG has little value for images AFAIK. Google is, of course, pushing the narrative of ‘modern formats’, but only to suit their own agenda.
If retrobatch is working for you, stick with it. The process is much more comprehensive, albeit at 4x the price.
This is most likely what I am going to do. Big plus of this solution is the ability to create a droplet for my workflow, so I don’t have to open Retrobatch to run it.
You are right about the relevance of PNG format on the web. Its only advantage is the transparency factor. But sometimes I need to make a quick screenshot, compress it and post it – for instance, to this forum (by ‘quick’ I don’t necessary mean low quality).
I have looked up a myriad of image optimizers on App Store. Most of them are calling themselves “pro” and “best”, but they are just garbage, most often produced by Chinese amateur and/or phony devs.
I use PNG for screenshots containing text almost 100% of the time. Text really gets degraded when in JPG or other format. While I typically don’t compress the PNGs, I do tend to resize. So that results is a good size reduction.
I don’t remember with Retrobatch in particular, but I don’t remember stellar reductions in PNG sizes unless I change the dimensions. Add to that … most of the time a reduction in size isn’t really needed with screenshots.
Yes, definitely png for graphics and text, not for images though. I have requested a refund on Image Smith and will look at Retrobatch and other options.
A second app I use a lot is a web-based app called Squoosh. I use it when I have 1-to-3 images to resize/compress. Simple and useful. Not great for batch jobs though. … and “free” even though that’s not why I use it.
That’s fantastic news! ImageOptim has always been my #1 app for both JPG and PNG images. It even works with SVGs. However, on Apple silicon, it requires Rosetta. For me, that’s an important negative factor.
I also have tried to contact Kornel by email before I started this topic, unfortunately without any response at all.
Do you know by any chance whether Kornel is about to release new version native for Apple silicon?
A final word on this - I have been using a range of tools for years, but google has an obsession with next gen formats, so although jpeg compression is better than webp in terms of image quality, I’m moving non-key images across with Retrobatch 2
Thanks to the many suggestions of Retrobatch, it really is a superb tool and today, I have been converting PNG to optimised webp files (I discovered that my client’s agency in S Africa was converting my full-sized 2500px jpg files to 1000px PNG files for a gallery - at 1.3Mb each they not only had no colour profiles, so looked terrible, but they were bigger than the original jpeg files…🤬
With re-iterating that the sRGB colour profiles were critical to making the images look good in multiple browsers.
It may appear that Google is obsessed with next gen formats, but they have have moved the game on from the “old” jpg and png formats, and also provided compression tools resulting in smaller web images which is a very good thing indeed. “Like quality” for “like quality” webp images are always smaller than the same image in jpg format with very few exceptions. In my experience having resized and compressed probably 1000’s of images, like for like, webp images are smaller than jpg . I individually check them all for quality and size. Webp images are significantly smaller for the same quality jpg version of the same image. Not once have I found a jpg version to be smaller than the webp version.
This is not correct. I suspect that you or the poor compression App are setting a low level of webp compression for webP, thus creating a webp version that is much larger than it needs to be.
I think a good approach is to compare like for like compression and carefully examine the visible effects, atrifects, etc., that image compression introduces. I would suggest using Squoosh’s (not Squosh App) sliding comparisson tool for an image comparison and then compare the resulting images size for that same point that you consider to be the limit of image degradation introduced by the compression. Establishing this point is critical to working out how much compression to use. If you compress above or below this point, your images will be either bigger or the quality will be visibly degraded. There are Apps that use a high compression value and then claim they are better because the compressed images are small and others such as jpegMini who use a relatively high compression rate and focus on the Pro market with claimed higher quality images.
Genarally the range of 75% to 85% is a good compression amount for both jpg and webp.
In addition, only resize once to the max size that will be displayed on screen, before you do any compression. This is so important.
Finally, if you want to use a batch image processor, I would suggest batch processing a few jpg images individually by resizing and creating a jpg and also webp image versions, one at a time in Squoosh and then do the same in Retrobatch or XnConvert, and then comparing the final images for quality and size.
Gary, you have a heart of gold and I sincerely appreciate your comment, but you forget what one of my ‘day jobs’ is - I have been working with the guys who actually develop these formats for 20 years. A while back I was contracted to teach the staff of global picture desks about image quality 😉
I guess, the debate over which image format is better than others is not conclusive. It probably depends on which particular tool you use for optimization.
As everybody knows, those tools use different sets of algorithms, to a different degree of aggressiveness. That is why it is difficult to find a perfect image optimizer. That’s why I am lamenting the lack of native version (for ‘M’ series of processors) of ImageOptim, which, in my opinion, has been as close to perfection as they go.
As far as webP format is concerned, I have tested it against JPG and my results shown no advantage for using webP – both in quality and in file size. The tool I’ve been using for those tests was Retrobatch. Perhaps, if I have used a different tool, my results would be different, too.
I would love to try Squoosh, but not as a web app. As I mentioned before, the desktop version was triggering anti-malware warning. The developer did not respond to my inquiry.
A big ‘thank you’ to those who suggested Retrobatch. What an app it is!
I have been experimenting and checking workflows and August Mueller the developer is helpful - he reminds me of some of the great Devs here, fixing minor issues instantly.
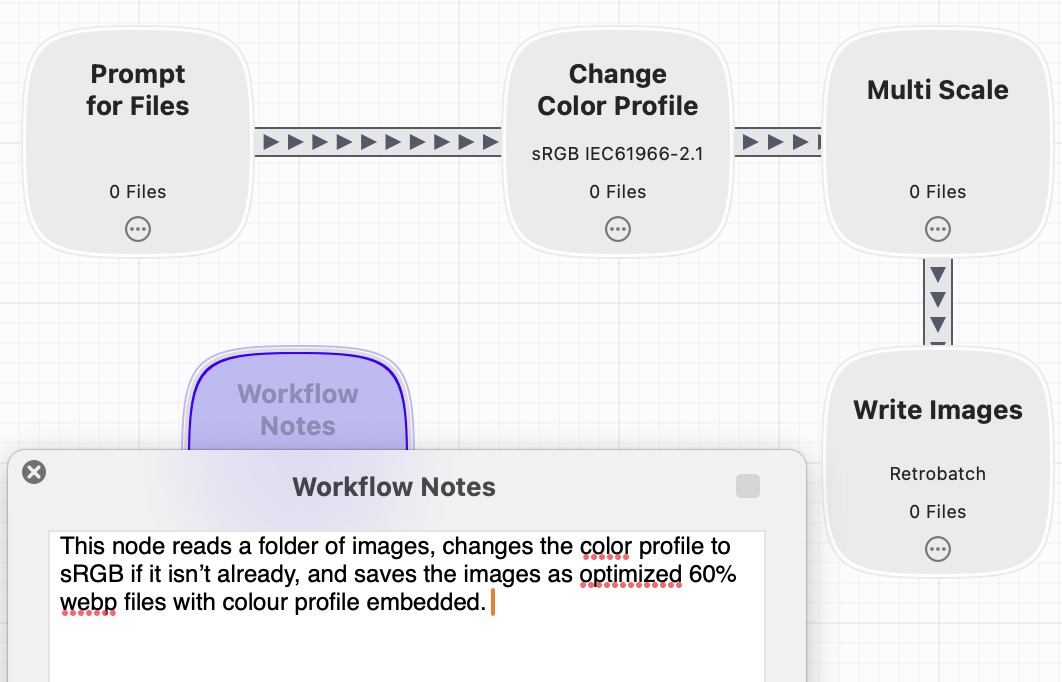
This is a quick workflow I put together and refined - Click play to select a single or multiple images. A couple of seconds later you have a folder of 5 .webp, jpeg or other format images, renamed and perfectly sized for @habitualshaker 's Scerer image stack 😁
Willing to share your retrobatch document? I’ve used it for a long time, but only recently upgraded to version 2. I think you are using 1-2 things that are new/refined for v2. Sharing your workflow would speed up my understanding of some of the new features. BTW, I love the Workflow Notes option … I don’t think that was in v1 and it’s certainly very useful.
Realising I am a little premature - I am using my script with a pre-release version of Retrobatch. Once the update is released, I will make the script available for people here
One thing that no one mentions here is image Metadata. Especially copyright information. Many image optimizers will strip that data out in order to further shrink the file size. Or even have the ability to add metadata such as the copyright holder or licensing information. Since 2018 Google has been displaying that information on their image search! Here is some information about Google’s use of image metadata:
My final post on this topic. I would like to thank all participants of this discussion for providing a wealth of choices in image optimizers.
I gave up my quest for best image optimizer that runs natively on Arm processors. Instead, I installed Rosetta 2 (something I wanted to avoid previously).
As soon as I did that, I updated ImageOptim to the latest version, which now can run on M-based Macs, as far as I can tell. Oh, well… At least now I can also use few other less important, old 64-bit apps.